By: Team CaloFit (AY1920S1-CS2103T-W11-4) Since: Sep 2019 Licence: MIT
- 1. Introduction
- 2. Setting up
- 3. Design
- 4. Implementation
- 5. Documentation
- 6. Testing
- 7. Dev Ops
- Appendix A: Product Scope
- Appendix B: User Stories
- Appendix C: Use Cases
- Appendix D: Non-functional Requirements
- Appendix E: Glossary
- Appendix F: Product Survey
- Appendix G: Instructions for Manual Testing
1. Introduction
Get Healthy with CaloFit!
CaloFit is a calorie tracker application written in Java. It provides a simple, fast, and easily-understood platform for users to manage their meals, find meal suggestions, and track their progress by setting their own calorie budget.
This guide provides information that will not only help you understand how CaloFit works, but also help you expand or modify its features based on what the user wants to track.
We are a team of 4 Computer Science students from the National University of Singapore(NUS), and hope that this guide has been helpful for you. In the case of any queries or bugs, feel free to contact us by following the instructions [here].
Here is a list of symbols and formats we will be using in this guide:
| Important information will be listed here for you. |
report Text in a grey highlight represents a command that you can enter into CaloFit.
Command Text that is bold and italicised represents a Class, Interface or Object.
Model#getMealLog() Text that is italicised only represents a method. The method name is listed after the "#" symbol.
2. Setting up
Refer to the guide here.
3. Design
3.1. Architecture
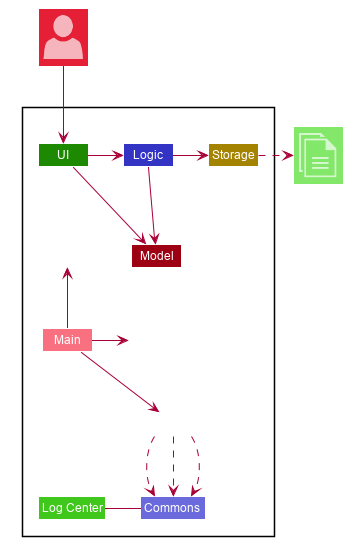
The Architecture Diagram given above explains the high-level design of the App. Given below is a quick overview of each component.
-
At app launch: Initializes the components in the correct sequence, and connects them up with each other.
-
At shut down: Shuts down the components and invokes cleanup method where necessary.
Commons represents a collection of classes used by multiple other components. The following class plays an important role at the architecture level:
-
LogsCenter : Used by many classes to write log messages to the App’s log file.
The rest of the App consists of four components.
Each of the four components
-
Defines its API in an interface with the same name as the Component.
-
Exposes its functionality using a {Component Name}Manager class.
This architecture system allows for different components of CaloFit to be implemented separately without conflict. Any interaction between the components is done through the Model interface to avoid exposing unnecessary details of each component.
For example, the Logic component (see the class diagram given below) defines it’s API in the Logic.java interface and exposes its functionality using the LogicManager.java class.
How the architecture components interact with each other
The Sequence Diagram below shows how the components interact with each other for the scenario where the user issues the command delete 1.
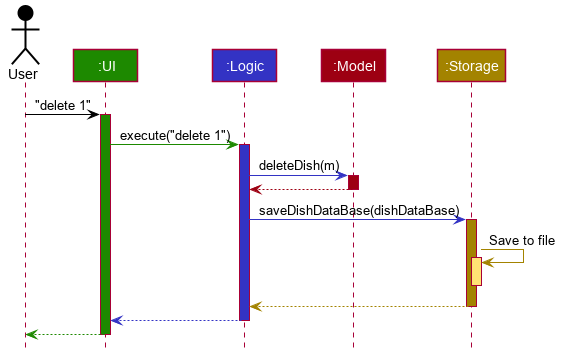
delete 1 commandThe sections below give more details of each component.
3.2. UI component
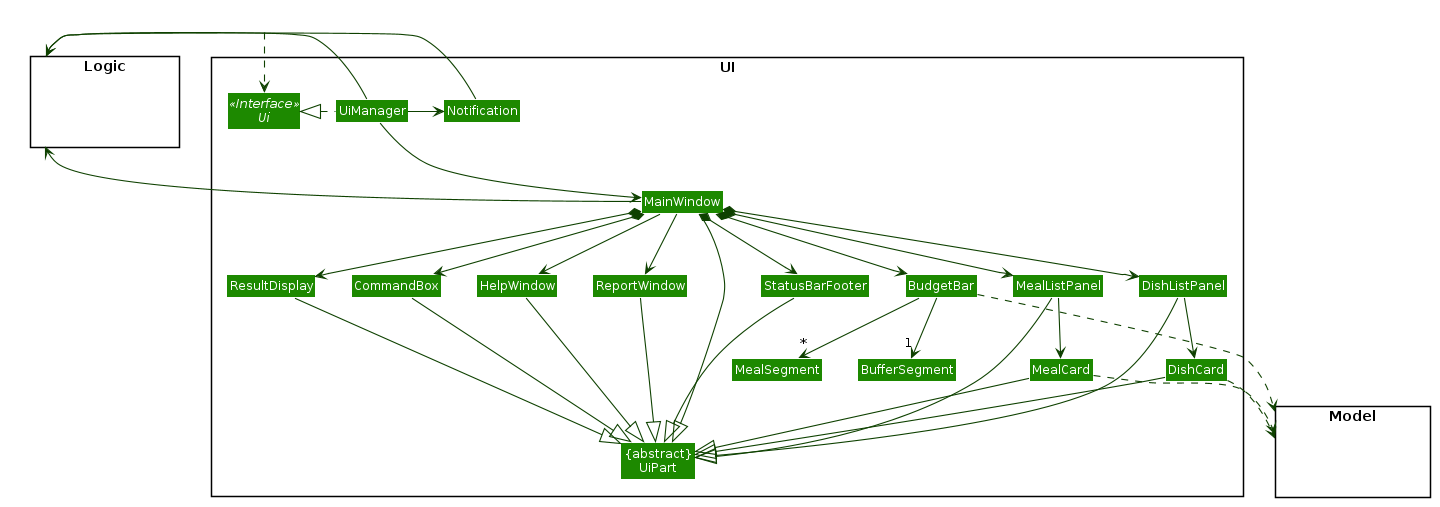
API : Ui.java
The UI consists of a MainWindow that is made up of parts e.g.CommandBox, ResultDisplay, DishListPanel, StatusBarFooter etc. All these parts, including the MainWindow, inherit from the abstract UiPart class.
The UI component uses JavaFx UI framework. The layout of these UI parts are defined in matching .fxml files that are in the src/main/resources/view folder. For example, the layout of the MainWindow is specified in MainWindow.fxml.
The UI component,
-
Executes user commands using the Logic component.
-
Listens for changes to Model data so that the UI can be updated with the modified data.
This design is similiar to the Architectural design of CaloFit, whereby different UiParts are encapsulated in the MainWindow java controller class. This allows the Logic to minimise interaction with the UI, since the MainWindow manages the changes to any UiPart classes that result from the execution in the Logic component.
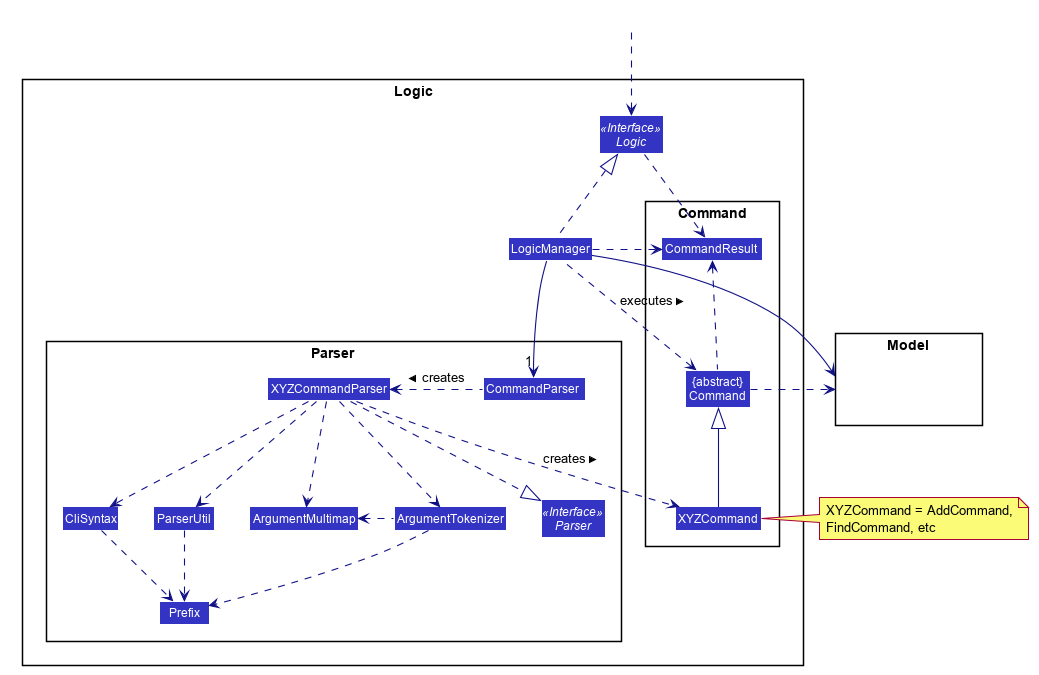
3.3. Logic component
API : Logic.java
-
Logic uses the CommandParser class to parse the user command.
-
This results in a Command object which is executed by the LogicManager.
-
The command execution can affect the Model (e.g. adding a meal).
-
The result of the command execution is encapsulated as a CommandResult object which is passed back to the Ui.
-
In addition, the CommandResult object can also instruct the Ui to perform certain actions, such as displaying help to the user.
This design allows the Logic component to maintain the Single Responsibility of processing the Command and returning the CommandResult. The UI displays any feedback to the user based on the CommnadResult object, without the need for the Logic to invoke any methods in the UI directly.
Given below is the Sequence Diagram for interactions within the Logic component for the Logic#execute("delete 1") API call.
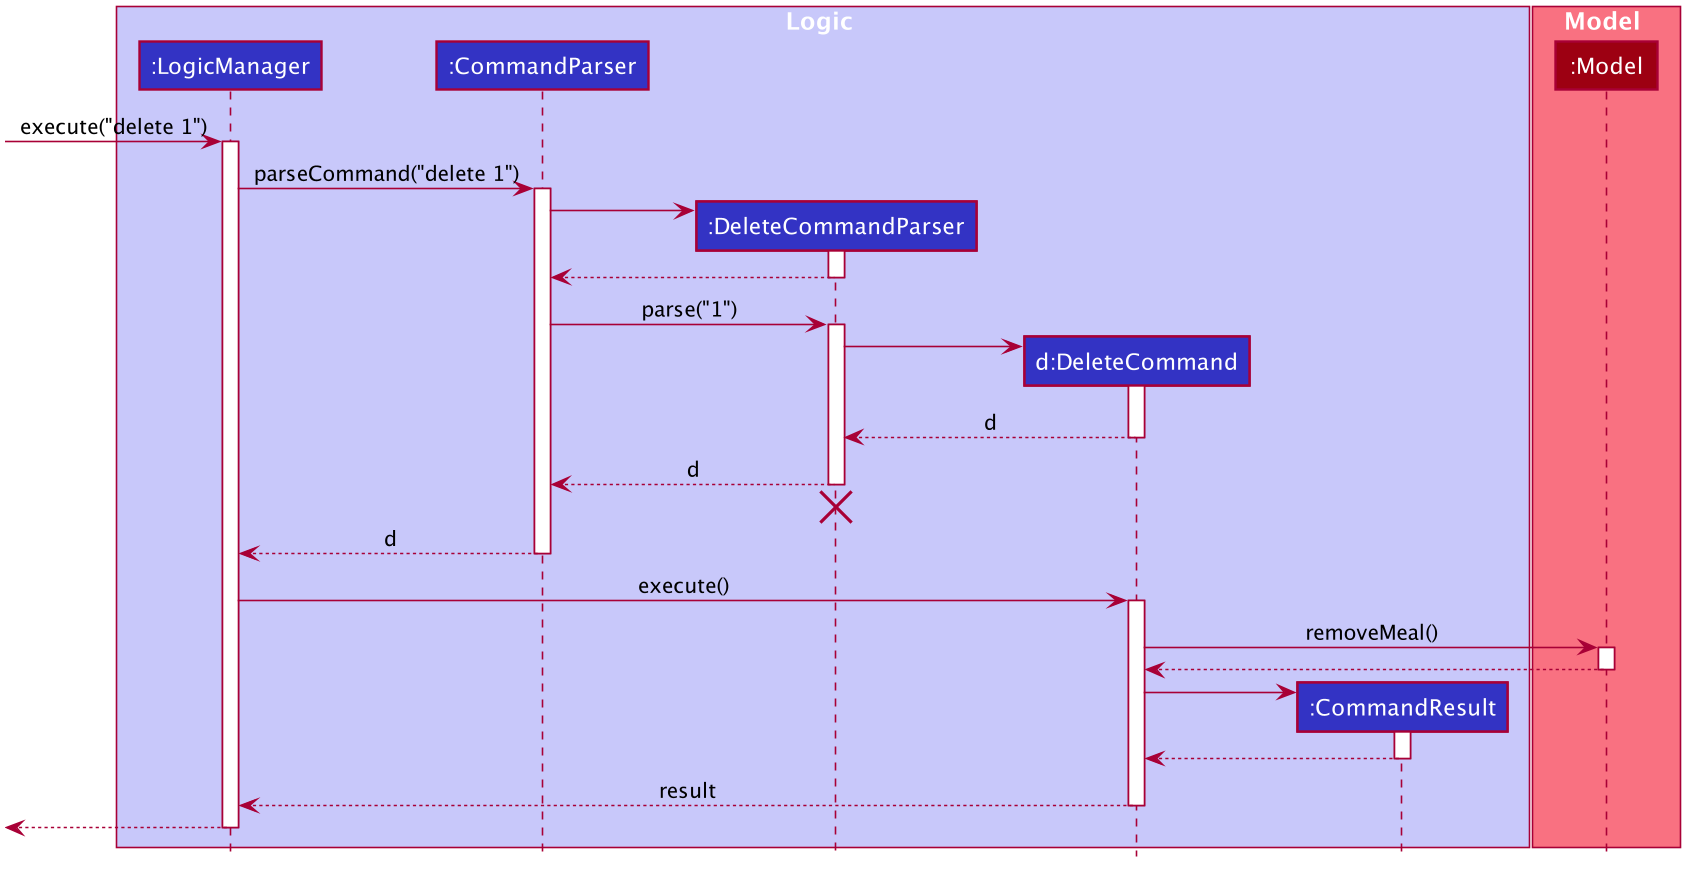
delete 1 Command| The lifeline for DeleteCommandParser should end at the destroy marker (X) but due to a limitation of PlantUML, the lifeline reaches the end of diagram. |
3.4. Model component
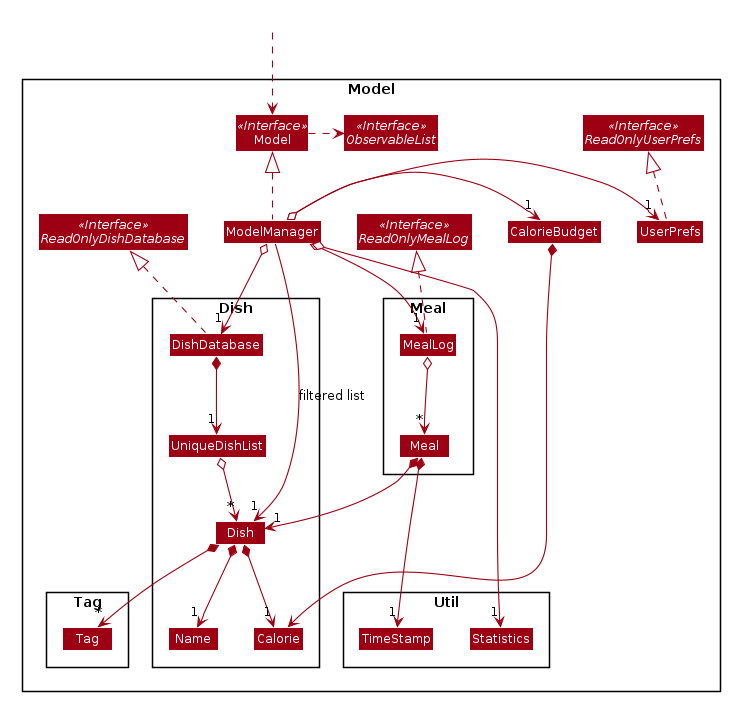
API : Model.java
The Model,
-
stores a UserPref object that represents the user’s preferences.
-
stores the DishDatabase data, MealLog data and CalorieBudget data.
-
exposes many unmodifiable properties that can be 'observed' by the UI component
-
List of today meals (ObservableList<Meal>)
-
List of suggested/filtered dishes (ObservableList<Dish>)
-
Current calorie budget (CalorieBudget) The UI components can be bound to this list, so that the UI automatically updates when the data in the list changes.
-
-
does not depend on any of the other three components.
This design allows many parts of CaloFit to be created without the fear of conflict with other classes. This is due to the Model interface acting as a Facade class that manages the interactions between the components that makeup CaloFit.
3.5. Storage component
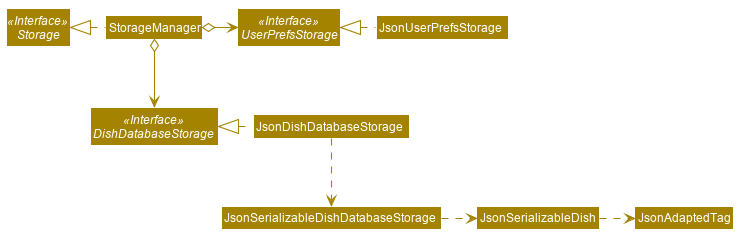
API : Storage.java
The Storage component,
-
can save UserPref objects in json format and read it back.
-
can save the DishDatabase data in json format and read it back.
-
can save the MealLog data in json format and read it back.
-
can save the CalorieBudget data in json format and read it back.
This design allows the users to save their MealLog, DishDatabase and CalorieBudget in a directory of their choice that is specified by the Path in the UserPrefs object.
3.6. Common classes
Classes used by multiple components are in the calofit.commons package.
4. Implementation
This section describes some noteworthy details on how certain features are implemented.
4.1. Meal Tracking Feature
4.1.1. Add feature
Implementation
Addition though flags (e.g add n/Chicken c/200 t/dry)
The add feature is implemented through the AddCommand class that extends the abstract Command class.
It interacts with other objects through the Model interface to manipulate the meal log and dish database to add meals.
The addition of meals is done through Model#addMeal() which would add the meal from the meal log list.
The add feature uses the Model to check if the dish is already in the database.
If the dish is already in the database, the meal will be added to the meal log only through the Model#addMeal() method.
If the dish the user wants to add is not in the database,
then the dish will be added to both the meal log and the dish database through the Model#addMeal() and
Model#addDish() methods respectively.
There are a few cases to take note:
-
If the dish name is in the dish database:
-
The user inserts the calorie information that is the same as the one in the dish database
-
The dish will be added to the meal log only.
-
-
The user inserts the calorie information different from the calorie in the dish database
-
This will create a new dish all together as there are differences in the calorie
-
The new dish will be added to both the meal log as well as the dish database
-
-
The user does not insert the calorie information
-
The program will look through the dish database and get the calorie information from that dish.
-
-
-
If the dish name is not in the dish database
-
The user inserts the calorie information
-
A new dish is created with that name and calorie information
-
The dish will then be added to both the dish database as well as the meal log.
-
-
The user does not insert the calorie information
-
The program sets the calorie information to 700 by default.
-
The dish will then be added to both the dish database as well as the meal log
-
-
The following sequence diagram shows how the add operation works when calorie information is included:
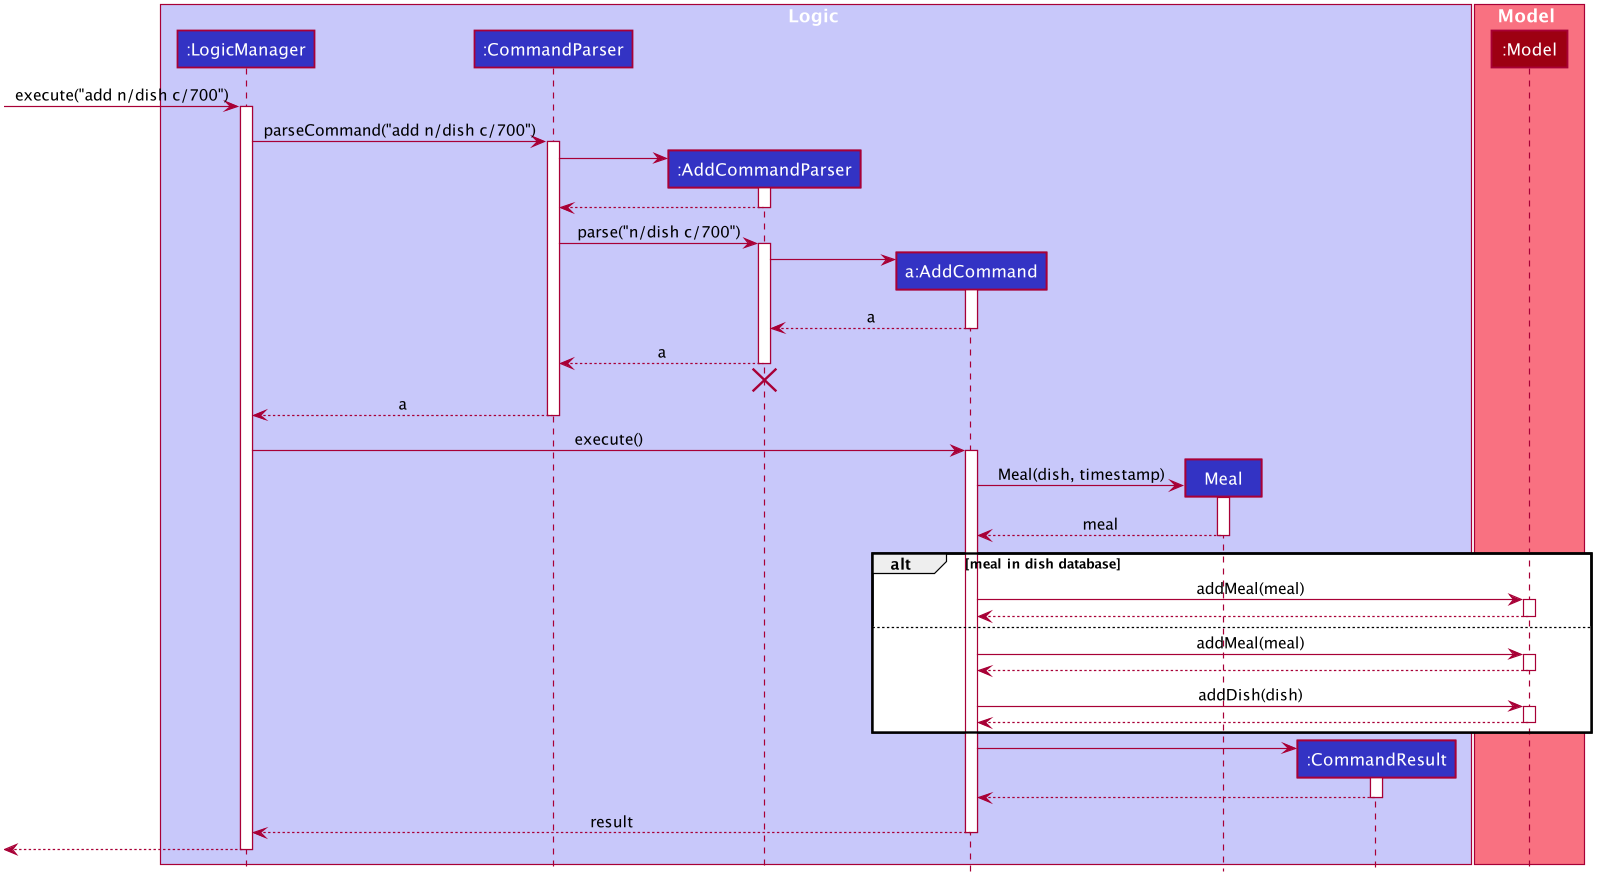
To detect whether the calorie tag is used in the user input, we use an UNKNOWN_CALORIE in the Calorie class. This will trigger either search for the dish in the dish database or create a new dish and input it into the dish database.
The input by the user and the dish in the dish database is considered equal only if both the name and the calorie information are the same.
Addition of tags are supported. However, they are not crucial to the implementation of the add function as tags are not considered when deciding equality of dishes.
Addition though indexes in suggested/find meal list (e.g add 1 2 3)
The add feature also supports the addition of meals through indexes in the suggested meal list.
This is done to improve the user experience as they do not have to always enter the long commands.
This feature is also implemented through the AddCommand class that extends the abstract Command class.
The add command in this case takes in a list of numbers pass to it through the AddCommandParser. The checking of valid
indexes is done by the AddCommandParser. Once the list is passed to the AddCommand, it calls Model#getFilteredDishlist()
which returns the filtered dish list. The add command will then loop through
the list of indexes and get the respective dishes from the filtered dish list.
We cannot add the meal immediately to the meal log as the filtered dish list would change when the calorie count changes. Hence the meals are first added to separate a toBeAddedMealList and once all the indexes are added to that list, MealLog#addListOfMeals(toBeAddedMealList) is called to add all the meals in to the meal log at once.
Design Consideration
Aspect: What is considered the same meal
-
Alternative 1 (Current choice): Compare name and calorie only
-
Pros: More precise compared to just comparing names.
-
Cons: Complications when adding meals.
-
-
Alternative 2: Compare name only
-
Pros: Easy comparison. Reduces complications when adding meals.
-
Cons: High collision.
-
-
Alternative 3 Compare name, calories and tags
-
Pros: Very precise comparison.
-
Cons: May cause the dish database to get very large just because the tag is different
-
-
Explanation of choice: As a calorie counter, the calories is an important part of the meal. Hence we need to consider it when comparing meals. Certain meals with the same name may not have the same amount of calories. Hence we decided to go with alternative 1.
Aspect: Data structure when storing in meals in meal log
-
Alternative 1 (Current choice): Use array list to store meals in meal log
-
Pros: Able to delete by index.
-
Cons: Interacting with the meal log will be slow.
-
-
Alternative 2: Use a hash map to store the meals in meal log
-
Pros: Able quickly retrieve information from the meal log.
-
Cons: Unable to delete through index. Also unable to store duplicates of the same meal.
-
-
Explanation of choice: The user may consume the same meal within the day. If we use a hash map, we will not be able to store the duplicate meals easily. Hash map does not preserve order. Hence, showing on the meal list section would be difficult as well. A user may not have a large amount of meals daily. Hence the array list would not be that large. Therefore, despite its limitation, an array list is still used.
4.1.2. Edit feature
Implementation
The edit feature is implemented through the EditCommand class that extends the abstract Command class.
It interacts with other objects through the Model interface to manipulate the meal log and edit meals.
The edit command allows the user to edit any fields in their previous meal entries of the same day with a single command. The edit command takes in a Index which specifies the location of the meal in the meal log and a EditDishDescriptor which contains the information the user wants to edit the meal with.
The edit of meal is done through a 2 step process. The meal is first retrieved from the meal log. Afterwards, the meal will be edited with the information in the EditDishDescriptor. Following that, the edited meal is inserted using the Model#setMeal() command. This swaps out the old meal for the new edited meal.
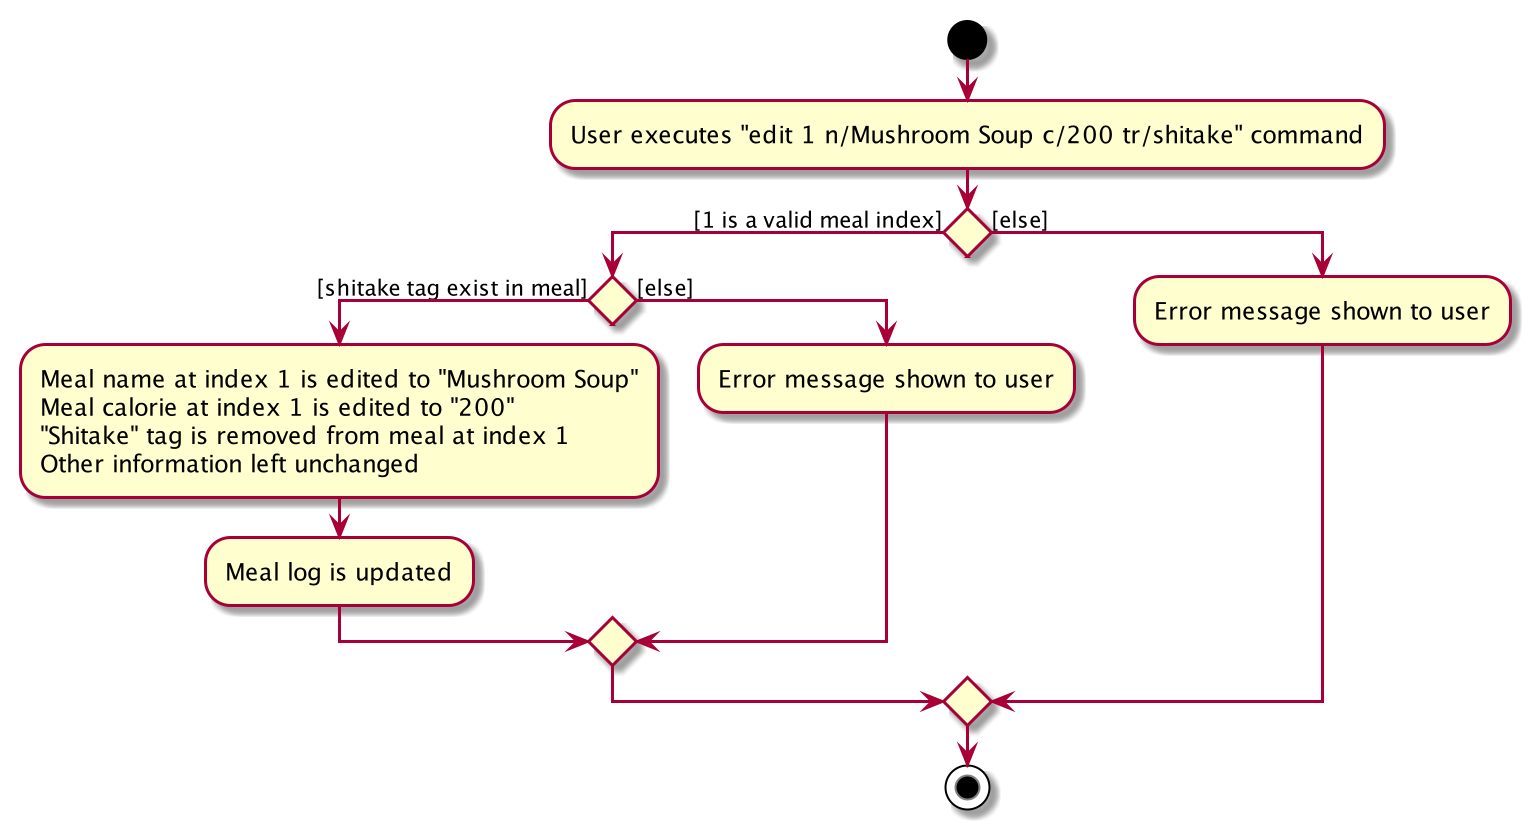
Below is the activity diagram that summarises the scenario when "edit 1 n/Mushroom Soup c/200 tr/shitake" is called by the user.
Design Consideration
Aspect: How editing meal in meal log will change the dish database.
-
Alternative 1 (Current choice): No change to dish database
-
Pros: Simple and easy for user to understand
-
Cons: Less accurate data in the dish database
-
-
Alternative 2: Edit the corresponding meal that was previously added when adding the meal
-
Pros: Better more accurate data in the dish database
-
Cons: Raises many complications that may get very confusing for the user
-
-
Explaination of choice: Interacting with the dish database will cause multiple different edge cases that need to be considered. This may cause it to be confusing for the user. For example, if they user intends to enters "Mushroom Soup" and get all the information from the dish database. However, the user spelt it wrongly and entered "Mushroom Soop" instead. When editing, do we search the dish database for the correct information of "Mushroom Soup" or do we just change the name and leave the other information untouched? Hence it is decided to allow the user to edit the fields and have no interaction with the dish database for a better user experience.
4.1.3. Delete feature
Implementation
The delete feature is implemented through the DeleteCommand class that extends the abstract Command class.
It interacts with other objects through the Model interface to manipulate the meal log and remove meals.
The delete command allows for removal of multiple dishes with a single command.
The delete command takes in a listOfIndex passed to it by the DeleteCommandParser. The checking of valid integers
is done by the DeleteCommandParser. Once the listOfIndex is passed to the DeleteCommand, it sorts the list from largest index
to smallest index using the Collections.sort(listOfIndex, Comparator.reverseOrder()). The DeleteCommand then loops through
the sorted list and checks if the index is within the size of the meal log. If the index is valid, DeleteCommand will
remove the respective meal from the meal log.
The removal of meals is done through the Model#removeMeal(meal) which would remove the meal from the meal log list.
The following sequence diagram shows how the delete operation works when index 1 is deleted:
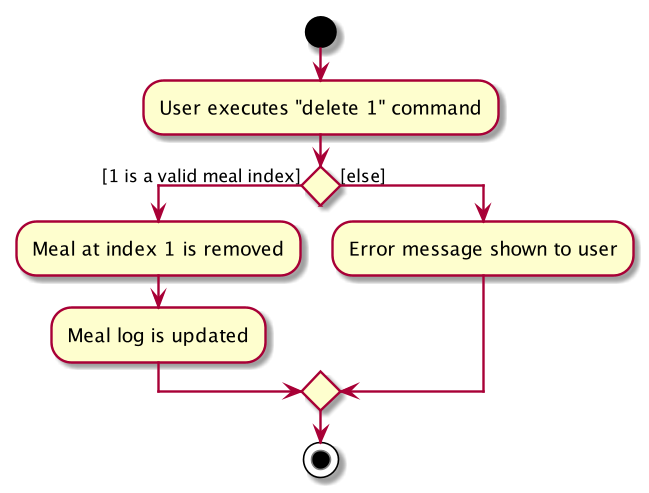
Below is the activity diagram that summarises the scenario when "delete 1" is called by the user.
Design Consideration
Aspect: How is the meal removed
-
Alternative 1 (Current Choice): Removed after the listOfIndex is sorted.
-
Pros: Prevent the reordering of the meal log causing the larger indexes to correspond to a different meal or out of bounds. (e.g delete 1 2 for a meal log with 2 meals. If we delete 1 first, the meal log will change to having 1 meal. The meal previously at index 2 is now at index 1. When doing delete 2, the meal at index 2 is now out of bounds as the meal log only has 1 meal.)
-
Cons: The command may take some time when handling large amounts of input. This is due to the sorting required.
-
-
Alternative 2: Loop through the indexes in the DeleteCommandParser and create a new DeleteCommand for every index.
-
Pros: Simple morphing of previous delete method.
-
Cons: Have to change other parts of the model breaking abstraction.
-
-
Explanation of Choice: The command is for the deletion of meals for that day. A person on average consumes 3 - 4 meals a day. Hence on average, the most meals to be deleted is 4. Thus the sorting time would not be too significant.
4.2. Budget Bar display
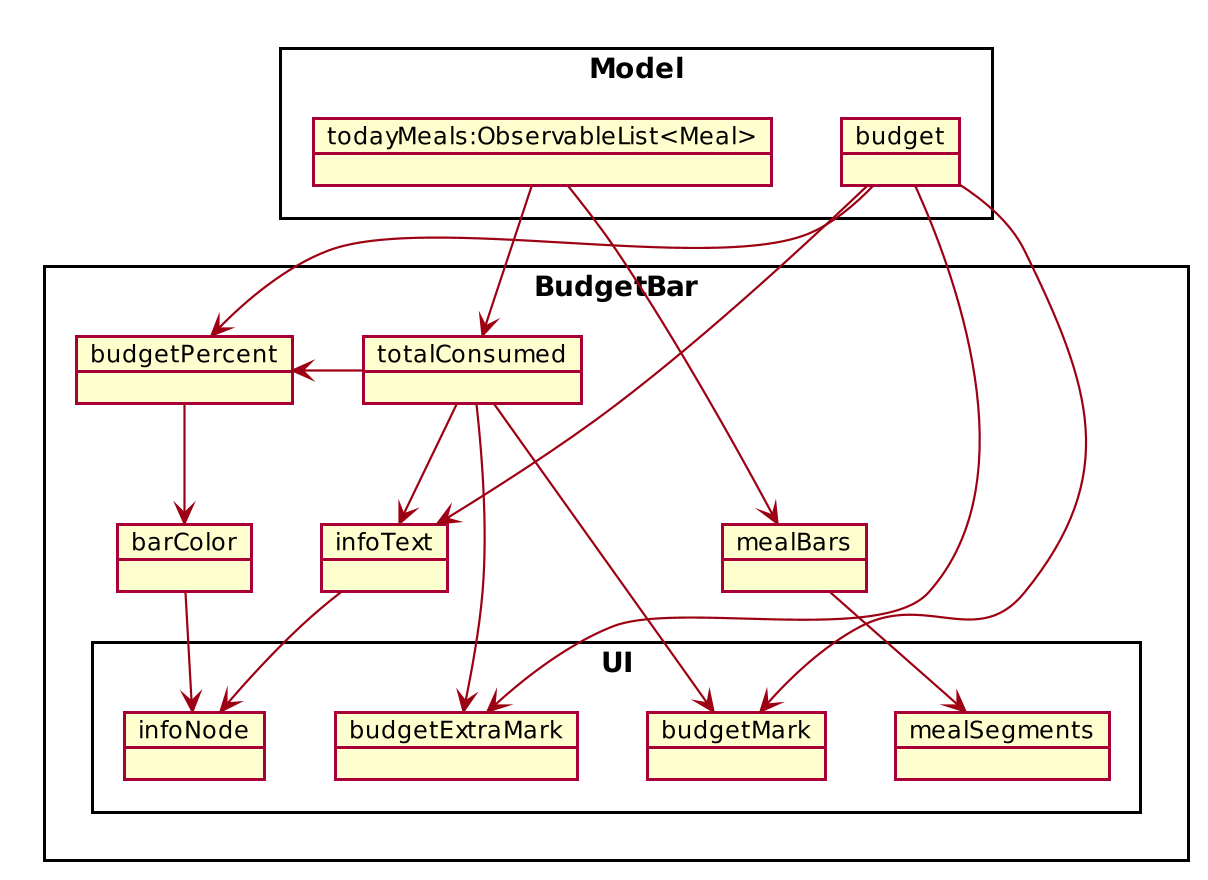
The budget bar display provides a graphic overview of meals consumed on the current day, comparing against the total calorie budget set by the user.
4.2.1. Implementation
The budget bar feature is implemented via the BudgetBar class.
It is a JavaFx UI component, which wraps around MealLog and CalorieBudget.
MealLog provides an observable list of meals eaten today,
while CalorieBudget provides the currently set user budget.
Using helper code from ObservableUtil and ObservableListUtil,
we compute several derived properties:
-
Total calories consumed
-
Percentage of budget consumed
From there, we again construct further observable/reactive values representing:
-
Bar info text color
-
Transitions from green to red, when more budget is consumed
-
-
Bar info text
-
If budget has been set, shows
<Total Consumed> / <Budget>. -
If budget has not been set, only shows
<Total Consumed>.
-
-
Meal segments
-
Each meal is displayed as a proportionally-sized segment in the whole bar.
-
-
Position of warning/danger markers
The following object diagram shows the reactive update dependencies.
4.2.2. Design Consideration
Aspect: Base UI component to display meal segments.
-
Alternative 1 (current choice): Use ControlsFx’s
SegmentedBarclass to handle display of bar segments.-
Pros:
-
No need to reimplement JavaFx
setLayoutlogic -
Better performance than
GridPane
-
-
Cons:
-
Dependency on external library
-
Have to create a separate
BufferSegmentclass to represent gap.
-
-
-
Alternative 2: Use JavaFx’s
GridPaneto lay out bar segments, andColumnConstraintsto appropriately set column widths.-
Pros:
-
No external library (other than JavaFx) needed
-
-
Cons:
-
Poor performance to due
Observablemachinery andGridPanelayout
-
-
-
Explanation of choice: Simpler implementation and better performance outweighs the cost of using an external library.
4.3. Assistance features
4.3.1. Find feature
The find feature displays the result of the searched dish on the right pane to the user.
Implementation
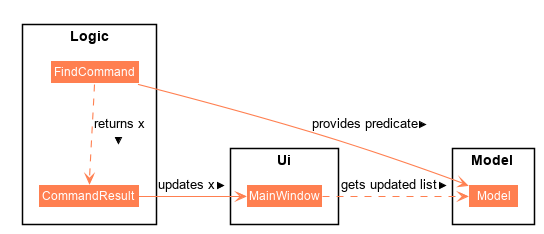
The find mechanism is toggled when the user types in the "find" command. Through a FindCommand that extends from the abstract Command class. It interacts with the object that implements Model interface by updating the observable list with a predicate that contains what the user is searching for.
Given below is a Class Diagram that shows how the FindCommand interacts with other components of CaloFit.
Given below is an example usage scenario and how the find mechanism behaves at each step.
Step 1. The user starts up CaloFit for the first time. The DishDatabase will be loaded with the initial data by calling MainApp#loadDishDatabase.
| If the DishDatabase is empty, nothing will be display. |
Step 2. The user enters "find soup" in the Command Line Input to invoke the FindCommand command which will run FindCommand#execute(). Model#setDishFilterPredicate() will be executed to update the observable list with the given predicate.
Step 3. The number of dishes found will be return, while printing the updated dish list on CaloFit right pane.
Aspect: How find executes
-
Alternative 1 (current choice): Update dish list with the search result
-
Pros: Neater code, easier to maintain and uses lesser memory.
-
Cons: Unable to get history of find list.
-
-
Alternative 2: Create a new list for every FindCommand.
-
Pros: Easier to understand and customise if require data for method.
-
Cons: Unnecessary memory wastage for list created and not used.
-
-
Explanation of Choice: Since we only need to show what the current user finds, there are no usage for the past find result.
Aspect: Data structure to support the find command
-
Alternative 1 (current choice): Stores the value in a dish list.
-
Pros: Commonly used, thus easier to understand and easier to deal with. It can also be easily updated.
-
Cons: Would constantly require Model with a responsibility that is not relevant to it’s current.
-
-
Alternative 2: Wrap the values in a Find object
-
Pros: Neater and easier to maintain, since all find-related values are stored in the Find object.
-
Cons: Additional class to maintain, harder for newcomers to understand code with too many classes.
-
4.3.2. Suggest feature
The suggest feature displays the suggested automatically to the user accordingly to the remaining calorie budget.
Implementation
The suggest mechanism is toggled when the application starts up. It will always display the suggested meals for the user in the right pane. The feature can be can be toggled back by typing the "suggest" command. Through a SuggestCommand that extends from the abstract Command class. It interacts with the object that implements the Model interface by updating the observable list with dishes that are within the calories budget. The calories budget is obtained from Model#getRemainingCalories().
Additionally, it implements the following operation:
-
Model#getRemainingCalories — gets the current allowed calories budget.
This operation is exposed in the Model interface as Model#getRemainingCalories().
Given below is an example usage scenario and how the suggest mechanism behaves at each step.
Step 1. The user starts up CaloFit for the first time. The DishDatabase will be loaded with the initial data by calling MainApp#loadDishDatabase.
| If the DishDatabase is empty, or the daily calorie budget have exceeded the set amount, or there are no dishes that is within the amount, nothing will be display. |
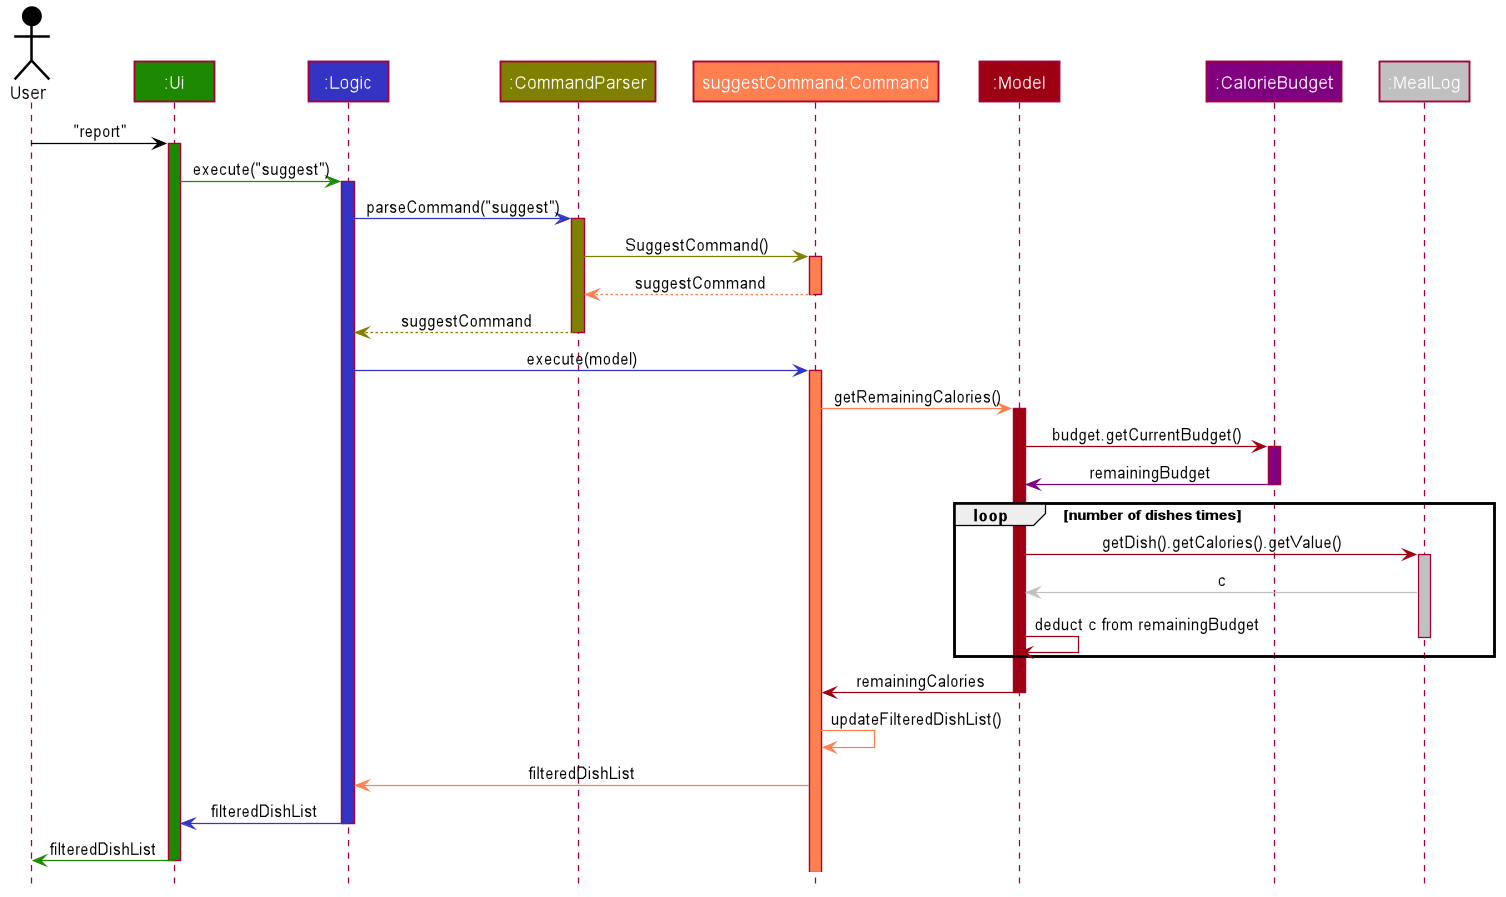
Step 2. The user enters "suggest" in the Command Line Input to invoke the SuggestCommand command which will run SuggestCommand#execute(). Model#getRemainingCalories() will be executed to get the remaining calories, which will provide Model#updateFilteredDishList with the calories budget to update the list accordingly.
Step 3. The success message will be returns, while printing the updated dish list on CaloFit right pane.
The following sequence diagram shows how the suggest operation works:
Aspect: How suggest executes
-
Alternative 1 (current choice): Update dish list with calorie budget
-
Pros: Neater code, easier to maintain and uses less memory.
-
Cons: Unable to get history of suggest list.
-
-
Alternative 2: Create a new list for every SuggestCommand.
-
Pros: Easier to understand and customise if require data for method.
-
Cons: Unnecessary memory wastage for list created and not used.
-
-
Explanation of Choice: Since we only need to show the user the current meal suggest, there are no usage for the past suggest result.
Aspect: Data structure to support the suggest command
-
Alternative 1 (current choice): Stores the value in a dish list.
-
Pros: Commonly used, thus easier to understand and easier to deal with. It can also be easily updated.
-
Cons: Would constantly require Model with a responsibility that is not relevant to its current.
-
-
Alternative 2: Wrap the values in a Suggest object
-
Pros: Neater and easier to maintain, since all suggest-related values are stored in the Suggest object.
-
Cons: Additional class to maintain, harder for newcomers to understand code with too many classes.
-
4.3.3. Notification feature
The notification feature prompts the user with new window if a meal had been missed.
Implementation
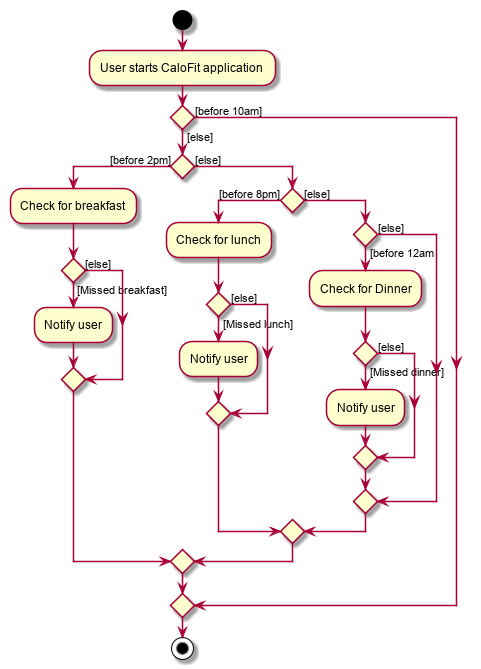
The notification feature is automatically activated when the application starts up. On start up, it is implemented through a NotificationHelper that gets information from Model#getMealLog().getTodayMeals() method to check if there are any meal consumed and if a meal had been consumed. The NotificationHelper class would the do a check on the timestamp of the latest meals by using various methods in the Notification class, more details are given below. If a meal had been missed, a notification will be prompted to the user to consume his meal, this prompt will constantly pop up every 10 minutes until a meal had been consumed. If a meal had been consumed within the period then the user can continue using the application without any prompt.
|
Notification will be prompted: - After 10am for breakfast - After 2pm for lunch - After 8pm for dinner |
|
Meals that will be counted: - As breakfast - anytime - As lunch - after 11am - As dinner - after 4pm |
Additionally, it implements the following operation:
-
A "timer" object that is in the UIManager class will ensure that the notifications are executed in 10 minutes interval.
-
Notification#eatenBreakfast — returns a boolean value to indicate whether the user has eaten their breakfast.
-
Notification#eatenLunch — returns a boolean value to indicate whether the user has eaten their lunch.
-
Notification#eatenDinner — returns a boolean value to indicate whether the user has eaten their dinner.
Given below is an example usage scenario and how the notification mechanism behaves at each step.
Step 1. The user starts up CaloFit for the first time. The DishDatabase will be loaded with the initial data by calling MainApp#loadDishDatabase with an empty MealLog.
| The application will immediately check once, when the application is launched, followed by every 10 minutes interval. |
Step 2. The application will then execute NotificationHelper once to check if any meal have been missed. If there is none then no notification will be prompted. If a meal is missed it will prompt to the user, and notify them every 10 minutes.
Step 3. After 10 minutes, UIManager will then execute NotificationHelper and check if the user has keyed in any meals. This process will carry on for every 10 minutes utill the user keys in his meal.
The following sequence diagram shows how the notification operation works:
Aspect: How notification executes
-
Alternative 1 (current choice): Refocus the notification Window.
-
Pros: Ensure that less memory is used, so that buffer overflow is not possible. Furthermore user would not be annoyed by multiple tabs.
-
Cons: Higher chance of notification not showing up due to a single error.
-
-
Alternative 2: Create a new Window for each notification
-
Pros: Less prone to mistake as previous notification will still stay until the user clears it.
-
Cons: Require much more memory as a new window is created, if the user was away for a period of time and the application was left opened, user would be required to clear quite a number of tabs.
-
-
Explanation of Choice: Since this feature serves as an assistance to the user, we should not bring in more hassle and inconvenience to the user. Thus even with a higher risk of notification not showing up due to error. After 10 more minutes the notification will be prompted.
4.4. Report feature
4.4.1. Implementation
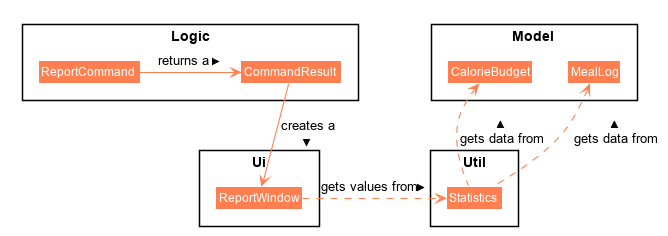
The Report feature is implemented through a ReportCommand that extends from the abstract Command class.
It returns a CommandResult object that has the boolean "isReport" set to True when ReportCommand#execute(Model) is called.
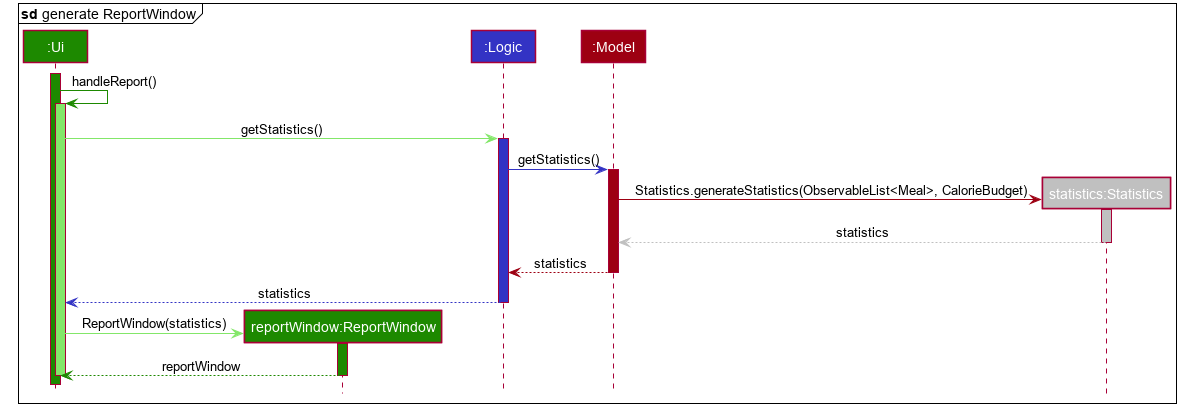
The MainWindow Ui component will check the CommandResult for the "isReport" boolean and create a new ReportWindow through the MainWindow#handleReport() method.
The ReportWindow object takes in a Statistics object that is created by calling Logic#getStatistics() which subsequently calls Model#getStatistics(). The Model then returns the Statistics object that is created based on the CalorieBudget and MealLog in the Model.
Additionally, the following operations are implemented in Statistics:
-
Statistics#generateStatistics(ObservableList<Meal>, CalorieBudget) — gets the statistics of the current object. Maximum, Minimum and Average calorie intake per day of the current month are calculated internally in this method.
|
While the above method takes in an ObservableList<Meal> instead of a MealLog, the list is generated from the MealLog and passed as the argument to avoid unnecessary interaction between the MealLog and Statistics classes. Therefore, even though MealLog is not taken in as a parameter, Statistics still depeneds on MealLog to get the data for generating the report. |
-
Statistics#getCalorieExceedCount(CalorieBudget, ObservableList<Meal>) — gets the number of days where calorie intake exceeded the calorie budget for that day.
-
Statistics#getMostConsumedDishes(ObservableList<Meal>) — gets the list of dishes which are consumed the most in the current month.
-
Statistics#getFoodChartSeries(ObservableList<Meal>) — gets the series containing the dishes eaten this month and their respective quantities.
-
Statistics#getCalorieChartSeries(ObservableList<Meal) — gets the series that represents the amount of calories taken by the user over the past month.
Given below is Figure 3.5.1.1 which is a Class Diagram that shows how the ReportCommand interacts with other components of CaloFit.
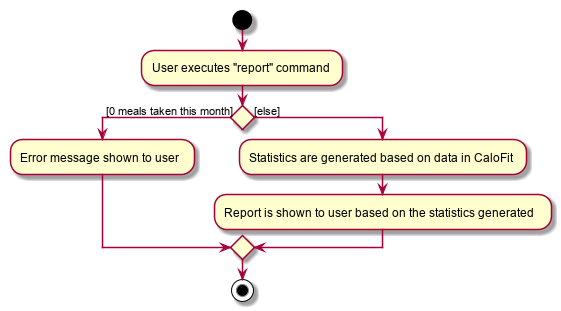
Given below is an example usage scenario and how the Report feature behaves at each step.
Step 1. The user starts up CaloFit for the first time. The ModelManager will contain a MealLog that has an empty list.
| If the user enters "report" in the Command Line Input with a MealLog that has no Meal entered this month, a CommandException will be thrown since there are no Meal to gather statistics pertaining to this month. |
Step 2. The user has added a Meal into the MealLog through the add feature.
Step 3. The user enters "report" in the Command Line Input to generate the report of CaloFit. The ReportCommand created will return a CommandResult object with "isReport" set to True. When the MainWindow checks this boolean, it calls MainWindow#handleReport() that creates the ReportWindow.
The following activity diagram in Figure 3.5.1.2 summarises the above usage scenario.
The following sequence diagram in Figure 3.5.1.3 shows how the "report" command works.
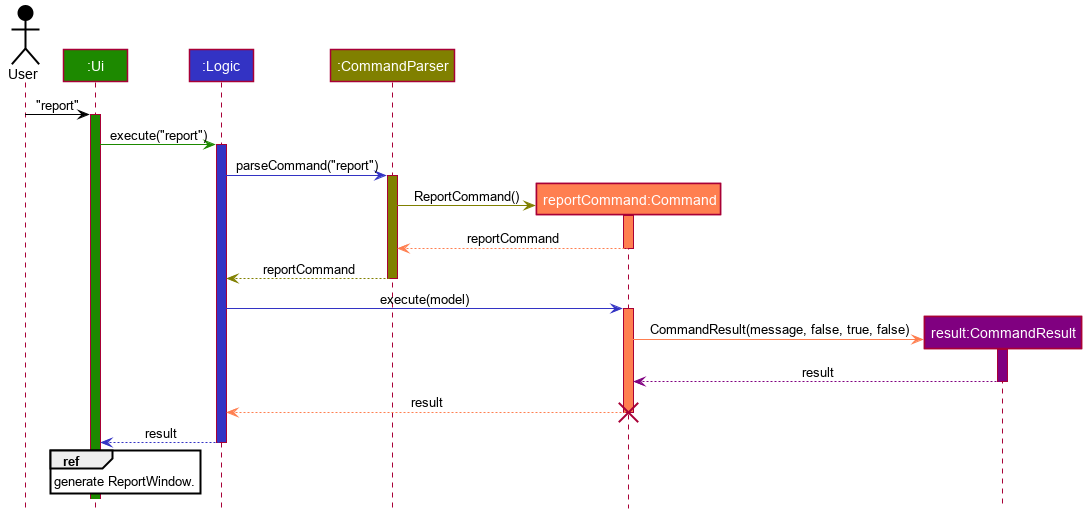
|
The parameters of the constructor of CommandResult in the above diagram are as follows, from left to right: String message — the message to be displayed to the user in the GUI. boolean showHelp: indicates if the HelpWindow should be generated. boolean showReport: indicates if the ReportWindow should be generated. boolean isExit: indicates if the application should exit along with any other windows that are being shown. Hence, only showReport is set to true to indicate that a ReportWindow should be created, while the rest of the booleans are set to false. |
The following sequence diagram in Figure 3.5.1.4 shows how the ReportWindow is generated.
4.4.2. Design Considerations
Aspect: When the Statistics object is created.
-
Alternative 1 (current choice): Only when a "report" command is entered.
-
Pros: Less processes carried out for each type of command.
-
Cons: At any point in using CaloFit, the statistics are not updated since the object is only created when the "report" command is entered.
-
-
Alternative 2: Every command creates a new updated Statistics object.
-
Pros: Logging of statistics can be accurate, and statistics are always updated.
-
Cons: Unnecessary as user does not need to see the statistics other than through a "report" command and results in every command having to do more work and interact with the Model more, possibly creating more bugs.
-
-
Explanation of Choice: Since the user only needs to see the updated statistics when a "report" command is executed, we only need to generate a new Statistics object with the updated values for that command, hence Alternative 1 is chosen to avoid adding unnecessary complexity to each command.
Aspect: Data structure to store the statistics in CaloFit.
-
Alternative 1 (current choice): Wrap the values in a Statistics object.
-
Pros: Neater code and easier to understand, since all statistic-related values are stored in the Statistics object and are not implemented in the Model.
-
Cons: Additional class to maintain and test for dependencies.
-
-
Alternative 2: Store the values as a List in the Model.
-
Pros: The statistics can be updated easily through the Model itself by updating the elements in the List. Accessing the statistics to display is easier as well.
-
Cons: Burdens the Model with a responsibility that is largely irrelevant to its current ones, which is to keep track of the Objects that make up the CaloFit model.
-
-
Explanation of Choice: To try and enforce Single Responsibility Principle as much as possible and avoid adding irrelavant functionality to Model.
4.5. Logging
We are using java.util.logging package for logging. The LogsCenter class is used to manage the logging levels and logging destinations.
-
The logging level can be controlled using the
logLevelsetting in the configuration file (See Section 4.6, “Configuration”) -
The
Loggerfor a class can be obtained usingLogsCenter.getLogger(Class)which will log messages according to the specified logging level -
Currently log messages are output through:
Consoleand to a.logfile.
Logging Levels
-
SEVERE: Critical problem detected which may possibly cause the termination of the application -
WARNING: Can continue, but with caution -
INFO: Information showing the noteworthy actions by the App -
FINE: Details that is not usually noteworthy but may be useful in debugging e.g. print the actual list instead of just its size
4.6. Configuration
Certain properties of the application can be controlled (e.g user prefs file location, logging level) through the configuration file (default: config.json).
5. Documentation
Refer to the guide here.
6. Testing
Refer to the guide here.
7. Dev Ops
Refer to the guide here.
Appendix A: Product Scope
A.1. Target User Profile
-
Health-conscious people watching their diet
-
Prefer desktop applications over mobile apps
-
Comfortable enough to work with text command-based interfaces
A.2. Value Proposition
The app is able to help the user keep track of their calorie consumption. This way, they can ensure that they keep to their own diet plans.
Appendix B: User Stories
| Priority | As a … | I want to … | So that I can… |
|---|---|---|---|
⭐⭐⭐ |
new user |
see usage instructions |
refer to instructions when I forget how to use the App. |
⭐⭐⭐ |
user |
create a new meal entry |
keep track of what I ate today. |
⭐⭐⭐ |
user |
see how many calories I have left in today’s budget |
know what I can eat later, and stay in budget. |
⭐⭐⭐ |
user |
be alerted if I missed a meal |
be reminded to stick to my meal plans. |
⭐⭐⭐ |
user |
change my daily calorie budget |
better reflect my new lifestyle requirements. |
⭐⭐ |
user |
modify my previous meal entries |
fix missing or inaccurate information. |
⭐⭐ |
user |
delete my previous meal entries |
undo mistakenly added meal entries. |
⭐⭐ |
user |
generate a summary of meals over the past month |
review my overall progress in keeping to my meal plan. |
⭐⭐ |
user |
view meal suggestions that fit in my remaining budget. |
figure out what I can eat while keeping to my plan. |
⭐ |
user |
create a new meal entry based of a meal I commonly eat |
keep track of a meal I eat often. |
{More to be added}
Appendix C: Use Cases
C.1. Use Case: Add meal entry
MSS
-
User enters meal information.
-
System adds entry into database.
-
System shows updated calorie budget for the day. Use case ends.
Extensions
-
1a. The given meal entry has insufficient information (calories, meal name, etc.)
-
1a1. CaloFit shows an error message.
Use case restarts at step 1.
-
{More to be added}
Appendix D: Non-functional Requirements
-
Should work on any mainstream OS as long as it has Java 11 or above installed.
-
Should be able to hold up to 1000 meal entries without a noticeable sluggishness in performance for typical usage.
-
A user with above average typing speed for regular English text (i.e. not code, not system admin commands) should be able to accomplish most of the tasks faster using commands than using the mouse.
Appendix F: Product Survey
Product Name
Author: …
Pros:
-
…
-
…
Cons:
-
…
-
…
Appendix G: Instructions for Manual Testing
Given below are instructions to test the app manually.
| These instructions only provide a starting point for testers to work on; testers are expected to do more exploratory testing. |
G.1. Launch and Shutdown
-
Initial launch
-
Download the jar file and copy into an empty folder
-
Double-click the jar file
Expected: Shows the GUI with a set of sample contacts. The window size may not be optimum.
-
-
Saving window preferences
-
Resize the window to an optimum size. Move the window to a different location. Close the window.
-
Re-launch the app by double-clicking the jar file.
Expected: The most recent window size and location is retained.
-
{ more test cases … }
G.2. Deleting a person
-
Deleting a person while all persons are listed
-
Prerequisites: List all persons using the
listcommand. Multiple persons in the list. -
Test case:
delete 1
Expected: First contact is deleted from the list. Details of the deleted contact shown in the status message. Timestamp in the status bar is updated. -
Test case:
delete 0
Expected: No person is deleted. Error details shown in the status message. Status bar remains the same. -
Other incorrect delete commands to try:
delete,delete x(where x is larger than the list size) {give more}
Expected: Similar to previous.
-
{ more test cases … }
G.3. Testing find feature
| Dish database should contain the dish name that the user is searching, otherwise nothing will be displayed. |
-
Finding a particular dish
-
Test case:
find soup.
Expected: The list of with "soup" in it.
-
-
Toggle between suggest and find
-
Test case:
suggestfollowed byfind soup.
Expected: CaloFit will display the suggested list of dishes followed by the soup dishes that the user is looking for.
-
G.4. Testing suggest feature
|
For suggestion to work: Dish database cannot be empty. Dish database have to contain dishes within remaining calorie budget. Otherwise suggest feature will not work. |
-
Suggesting dishes based on remaining calorie budget.
-
Test case:
set 1000followed byadd n/rice c/600
Expected: Dishes with 400 calories and below will be displayed.
-
-
Toggle between find and suggest.
-
Test case:
find soupfollowed bysuggest.
Expected: CaloFit will display the soup dishes that the user is looking for followed by the suggested list of dishes.
-
G.5. Testing notification feature
|
Changing of system time would be required. Do not launch the application till instructed. |
-
Notify user when user miss their breakfast.
-
Test case: Set system time to anytime after 10am, clean launch the application, and leave it for as long as the user want to test.
Expected: When the application first launch, a notification will be prompted. Followed by every 10 minutes for as long as the application is running.
-
-
Notify user when user miss their lunch.
-
Test case: set the system time to 8am, clean launch the application,
add n/cereal c/300, set the system time to 3pm, leave it for as long as the user wants to test.
Expected: A notification indicating that lunch have been missed would be prompted every 10 minutes.
-
-
Notify user when user miss their dinner.
-
Test case: set the system time to 8am, clean launch the application,
add n/cereal c/300, set the system time to 9pm, leave it for as long as the user wants to test.
Expected: A notification indicating that dinner have been missed would be prompted every 10 minutes.
-
G.6. Testing the generation of the report
| All test cases assume an empty meal log prior to the inputs. To ensure this, you can go to the directory where you installed CaloFit, click on the "data" directory, and delete the mealLog.json file before restarting the application. |
-
Generation of Report.
-
Test case: No meals in input for current month, followed by
report.
Expected: Report is NOT generated. An error message will be shown in the result display box of CaloFit. -
Test case: Any number of meals has been entered for current month, followed by
report.
Expected: Report is generated normally. -
Test case: Any number of meals has been entered for current month and system time is changed to a different month or year, followed by
report
Expected: Report may initially be wrong as stated in the [Report Feature of our User Guide]. The data in CaloFit will be updated in 2 minutes to fit this change in system time, after which the scenario will be similiar to the previous test case.
-
-
Testing validity of number of days where Calorie of the month
-
Test case:
add n/carbonara c/689,set 500, followed byreport.
Expected: Number of days calorie intake exceeded budget will be 1. -
Test case:
add n/carbonara c/689,set 1000, followed byreport.
Expected: Number of days calorie intake exceeded budget will be 0.
-
-
Testing validity of list of most consumed dishes.
-
Test case:
add n/carbonara c/689,add n/beef stew c/200, followed byreport.
Expected: Carbonara and Beef Stew will be in list. -
Test case: same as previous, with additional
add n/carbonara c/689beforereport.
Expected: Only Carbonara will be in the list.
-
-
Testing validity of Calorie Over Time graph.
-
Test case:
add n/carbonara c/689,add n/beef stew c/200, followed byreport.
Expected: Calorie intake for today’s date will be 889. -
Test case: same as previous, with additional
add n/beef stew c/200beforereport.
Expected: Calorie intake for today’s date will be 1089.
-
-
Testing validity of Quantity of Food Consumed graph.
-
Test case:
add n/carbonara c/689, followed byreport
Expected: Quantity of carbonara consumed will be 1. -
Test case:
add n/carbonara c/689,add n/beef stew c/200, followed byreport.
Expected: Quantity of carbonara consumed will be 1. Quantity of beef stew consumed will be 1.
-
-
Testing validity of Maximum, Minimum, and Average calorie intake of the month.
-
Test Case:
add n/carbonara c/689, followed byreport.
Expected: Maximum will be 689, Minimum will be 0, and Average will be 22. -
Test case:
add n/carbonara c/689,add n/beef stew c/200, followed byreport.
Expected: Maximum will be 889, Minimum will be 0, and Average will be 30(for 30 day months) or 29(for 31 day months). -
Test case: same as previous, with additional
add n/beef stew c/200beforereporton a different day in the same month.
Expected: Maximum will be 889, Minimum will be 0, and Average will be 36(for 30 day months) or 35(for 31 day months).As the above test case requires a change in system time, do allow 2 minutes for CaloFit to be updated, as stated in Point 1(Generation of Report).
-